Showing posts with label Windows XP. Show all posts

Create Disk Partitions In Windows XP Using MiniTool Partition Wizard

Tuesday, April 24, 2012

Nowadays, computer’s hard disk come in massive size. It is not a problem anymore to the users to keep the collection of movies and songs together with the applications software in single hard disk.

But, users maybe very difficult and may have to take a long time to search their own data in their own hard disk which may have single partition if they pooling too many data in it.

In order to ease this problem, some people may create few disk partitions and classify certain type of data into certain partition. For me this is an ideal way to solve the problem.

In this article, I will suggest you the free software that you can use to create disk partitions.

There are many free software from Internet that you can use to create disk partition in Windows. One of them is MiniTool Partition Wizard released by MiniTool Solution Ltd. It has 5 versions available and if you want to use it for free you can pick the Home Edition version. 


Click Here To Download.


The bootable versions for this software is also available but I will not discuss about this versions in this article. But if you need it you can download it here.


How To Use

Now, assume that you have a computer with Windows XP installed. You only setup single partition on you hard disk. Let say, you want to setup another more partition on your hard disk and you want to do this directly from Windows XP’s environment. So what you need to do is the following:

  1. Install the MiniTool Partition Wizard in your computer.

    Capture


  2. When installation finish, you can launch the software and you will see the MiniToolPartition Wizard’s box like below

    Capture


  3. Based on above, let say you want to partition the space of drive C: (that represent the whole space of hard disk) into 2 part.

    So, highlight and right click the drive C: –-> when the context menu appears, click Move/Resize –-> Move/Resize Partition wizard appears

    Capture


  4. Using the wizard above, you can click the toggle and move the partition right or left to resize the second disk’s partition.

    You can determine the size of second disk’s partition by viewing the Unallocate Space After: during resizing process –-> click OK after you finish resizing.


    Capture


  5. Now, based on above, you will see the additional partition labeled with Unallocated under drive C:’s partition.

    Highlight and right click that Unallocated partition –-> when the context menu appears click Create –-> you will see the Create New Partition’s wizard like below


    Capture


  6. Inside the red line above, fill the information about the new partition (second disk’s partition) such as partition label, the partition’s type, e.g: primary partition, the file system you want to install into disk partition, eg: NTFS and the partition’s drive letter. Leave the cluster size as default –-> click OK

    Capture


  7. Now, you will see the main wizard that display the information about new partition or second disk’s partition. See above.

    Click Apply to run the resizing process –-> you will see the box below


    Capture


  8. Click Yes –-> click Restart Now when you see the notice’s box below

    Capture


  9. Just after computer restart and load into Windows, you will see the Partition Wizard – Boot Mode’s box like below.

    Capture


  10. Wait until the process finish and the computer restart or you may need to restart the computer manually.

    Capture


  11. After restarting, click My Computer on Windows desktop –-> you will see the new partition labeled Local Disk with drive letter E:. See above.

Install Windows XP Directly Using ISO Image File – Part 2

Monday, March 05, 2012

In the first part of discussion like title above, we had learned how to prepare the USB thumb drive to become installer of Windows XP that is bootable. The installer which in form of ISO image had been copied into USB thumb drive together with grub4dos bootloader and RAM disk driver (FiraDisk and WinVblock) as the main components.

Now in this second part, we will learn how to install Windows XP into computer system using bootable USB thumb drive we had prepared. Of course many of you may know how to perform the installation of Windows XP in normal way. But, using the method mentioned on the title above, it is slightly different.


What You Need

  1. The computer system that has 512 MB RAM and ABOVE.


  2. The bootable USB thumb drive (with Windows XP ISO image inside).


Before The Procedures

  1. The first boot device in targeted computer system must USB thumb drive or USB HDD. Enter the BIOS setup program to change boot order

    Capture


  2. If the targeted computer system use SATA hard disk, you should disable AHCI controller in BIOS setup program or otherwise it cannot detect its own system hard disk during setup process.

    Capture


The Procedures

  1. Attach the bootable USB thumb drive into USB port of targeted computer system –-> power on the computer.

  2. Please wait until you see the option menu like below

    Capture

  3. Based on above, highlight INSTALL XP PRO – STEP 1 – XP Setup from ISO using FiraDisk –-> press Enter button.


  4. Please wait until you see the message below.

    Capture 


  5. Now, press Enter button and you will see the message below.

    Capture


  6. Press Enter button --> Windows setup will start to inspect the configuration of targeted computer system and show the blue setup screen.


  7. When you see the message on setup screen like below, press F6 to install a third party driver.   

    Capture


  8. Please wait while Windows setup load the files. Then, you will see the message below. 

    Capture


  9. In this step, you will install the third party driver. In this case is RAM disk driver, eg: FiraDisk or WinVBlock

    Now, press button
    S and you will be re-directed to the list of additional devices like below.

    Capture

    Note:
    Choose the RAM disk driver based on the type of computer system, eg: 32-bit or
    64-bit system 


  10. Based on above picture, highlight WinVBlock Bus (32-bit) and press Enter button. Again, you will be re-directed to the message like below.

    Capture

    Note:
    At this step you are ready to install the RAM disk driver. You can choose either FiraDisk or WinVBlock. If choosing FiraDisk generate BSOD error message, SWITCH TO WinVBlock.

    Windows XP ISO image


  11. You can continue the setup process by pressing Enter button --> setup process will continue. See below.

    Capture


  12. Finally, you will see the Windows setup welcome page like below

    Capture

    Start from this point you can perform standard procedures of installation of Windows XP until you reach and see the Windows welcome screen.      


Install Windows XP Directly Using ISO Image File – Part 1

Monday, February 27, 2012

Recently, one of the visitors of my blog had raised an issue about installing Windows XP using USB thumb drive. The issue is he only has Windows XP ISO image and cannot extract it into bootable USB thumb drive. I ask him to use the freeware named UNetbootin, but he claim it is ineffective and I agree with what he said after perform an investigation.

After spent many hours and days to find the solution for his problem, finally I had discovered the method how to install Windows XP into computer system by directly using Windows XP ISO image file. In other means, you do not need to extract the ISO image file into bootable USB thumb drive using a freeware that you may need to download from Internet. So far, I did not find the freeware that can extract Windows XP ISO image file into USB thumb drive and make it bootable.


IN THIS ARTICLE WE WILL LEARN HOW TO INSTALL WINDOWS XP DIRECTLY USING ISO IMAGE FILE. This article will be divided into TWO PARTS as follow

  1. Part 1 – We will learn how to prepare a USB thumb drive to become bootable Windows XP installer.

  2. Part 2 – We will learn how to install Windows XP into computer system using the bootable USB thumb drive we had prepared. 

Actually, you can use this great method to install multiple Windows OS into computer system just by using a single USB thumb drive. But, due to the scope of discussion in this article, I will only show you how to install the single Windows XP into a computer system. I have made a little modification on its procedures.


IN THIS FIRST PART OF THIS DISCUSSION, I WILL SHOW YOU HOW TO PREPARE THE USB THUMB DRIVE TO BECOME BOOTABLE WINDOWS XP INSTALLER.


What You Need

There are SEVEN items that you need to fulfill before you can proceed in preparing the USB thumb drive to become bootable Windows XP installer. There are as follow

  1. A computer system equipped with USB port. It can run whether Windows XP, Windows Vista or Windows 7. My computer has Windows 7 installed. 


  2. The empty USB thumb drive. Its size can be in the range of 2GB to 4GB or above.


  3. A target computer system, where Windows XP will be installed into it. The computer must have 512 MB size of RAM and ABOVE.


  4. An ISO image file for Windows XP, eg: WindowsXP.iso. You can convert the contents of Windows XP CD installer into the ISO image file. Click here for the guide.


  5. The freeware name RMPrepUSB. You must download version 2.1.638 or later and extract it into your computer using the compression software like 7zip or WinRAR. Click here to download and scroll down the mouse until you see the link like below

    Capture 

    Note:
    You must download and install the latest version of RMPrepUSB software into the computer system. It can assure the latest file of grub4dos bootloader be copied into the USB thumb drive, thus to prevent the error message during Windows XP setup. 
      

  6. The zipped file, XP7PWD. You have to extract this file using the compression software like 7zip or WinRAR. Click here to download and scroll down the mouse until you see the link like below.

    Capture 

    Note:

    I recommend you to create a folder and named it with the suitable name, eg: XPPWD. Then, extract the zipped file XP7PWD into the folder. You need the password in order to extract the file. THE PASSWORD IS rmprepusb

    Capture

    After extraction, you will see these list of files (see below) inside the XPPWD folder.

    Capture 


  7. The menu.lst file. I had performed the little modification on this file. Click here to download and EXTRACT IT to get the file. Copy and paste menu.lst file into folder XPPWD. This will overwrite the original one inside it.

    Note:
    This is an optional step.


Before The Procedures

I assume that you had prepared the items said in the previous section especially the empty USB thumb drive, Windows XP ISO image file and the folder XPPWD. Now, before you perform the real procedures, you need to perform the following

  1. Install the freeware RMPrepUSB into the computer system.


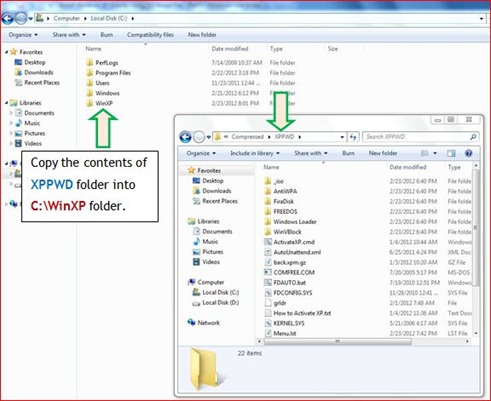
  2. Create a folder inside the root directory of system drive (C:\ drive) and names it with the suitable name, eg: C:\WinXP
    Capture 

  3. Copy the contents of folder XPPWD into C:\WinXP folder.

    Note:
    PLEASE DO NOT COPY THE ENTIRE FOLDER OF XPPWD into C:\WinXP. I mean ONLY ITS CONTENTS. 


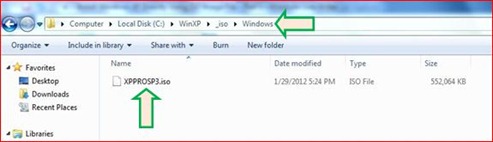
  4. Rename the Windows XP ISO image file to XPPROSP3.iso and save it into C:\WinXP\_iso\Windows. See the picture below
    Capture


The Procedures

In this section, you will learn how to prepare the USB thumb drive to become the bootable Windows XP installer.

  1. Attach the empty USB thumb drive into the USB port of computer system.


  2. Run RMPrepUSB by double click its icon on your desktop –-> click Yes

    Capture


  3. The interface below will appears on your screen. 

    Capture


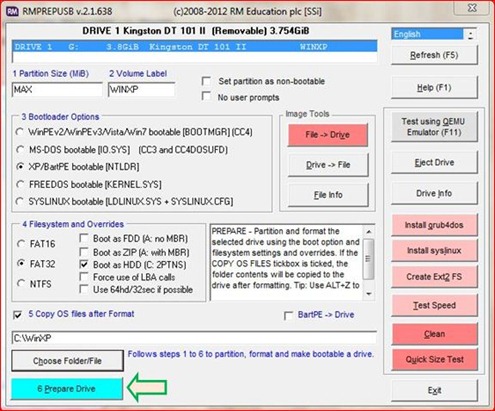
  4. Based on the above picture, make sure you have highlighted the USB thumb drive. In this case is Drive 1 G: Kingston DT 101 II  


  5. Under Bootloader Options click the radio button that represent XP/BartPE bootable [NTLDR].


  6. Under Filesystem and Overrides click radio button FAT32 and click the check box Boot as HDD (C: 2PTNS) to show the right sign sign.


  7. Click to show the right sign sign, the check box Copy OS files after Format.


  8. Now click the button Capture and you will be presented with the box like below.

    Capture 

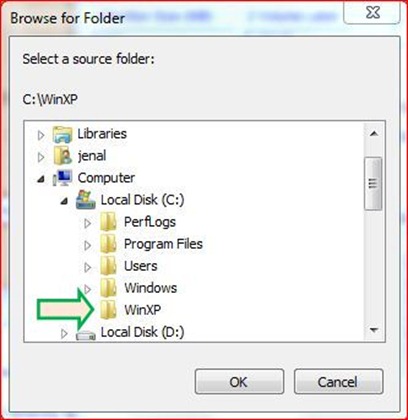
  9. Click Yes –-> the box Browse for Folder appears on the screen –-> choose the folder you have created earlier (under Before The Procedures). Eg: C:\WinXP –-> click OK
    Capture


  10. Click Capture --> click OK –-> click OK. This will erase all data in your thumb drive and create a new partition on it.
    Capture


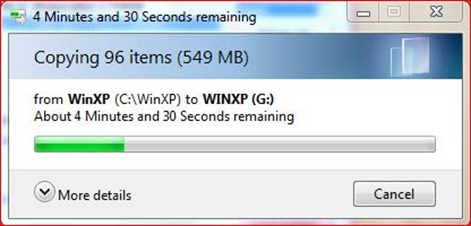
  11. Wait the RMPrepUSB copying the contents of folder WinXP to USB thumb drive –-> click OK after the process finish.
    Capture


  12. Now, you need to install the grub4dos bootloader into you thumb drive. For the purpose of that, you need to click Capture and then click Yes –-> click OK.

    Capture


  13. Press Enter button when you see the interface below –-> click OK to copy the grldr file to USB thumb drive

    Capture


  14. When you see the message like below, click Capture.

    Capture 

Now, you have finished preparing the USB thumb drive. In other means it now become bootable Windows XP installer with grub4dos bootloader installed.

Soon, in the next part, I will show you how to install the Windows XP OS into targeted computer using the bootable USB thumb drive that you had prepared.


Continue To The Link Below

  1. Install Windows XP Directly Using ISO Image – Part 2
Related Posts Plugin for WordPress, Blogger...